Welcome to Mascha’s garden

summer harvest

Welcome to my blog! The purpose of this blog is to share with you some of the adventures in my garden and scatter the seeds of my knowledge. While growing food is my forte, blogging is a new adventure…so… if you are keen to learn more about growing your own organic vegetables and fruit, permaculture, wildlife habitat and maybe even keeping some chickens, goats and bees…welcome to Mascha’s Garden!

© Mascha’s Garden, 2024. Unauthorised use and/or duplication of this material without express and written permission from this site’s author and owner is strictly prohibited. Excerpts and links may be used, provided that full and clear credit is given to Mascha’s Garden with appropriate and specific direction to the original content.

What to grow in February (Cool-Temperate climate)


IMAG2243

The Gawler Foundation herb garden in full bloom.

There is still a month of hot weather ahead, hopefully we won’t experience the extreme temperature fluctuations we had last month, which were not great for planting out vegetable seedlings. If you are planting seedlings this month remember to give them a regular deep soak with water and shade them from the afternoon sun.

If you have some empty spots in your vegetable beds, this month you could try planting seedlings of:

Red and Green Cabbages, Broccoli, Cauliflower (try beautiful Romanesco or Purple Cauliflowers) Brussel Sprouts, Kale, Leeks, Spring Onions, Silverbeet, Rainbow Chard, Asian greens (Bok Choy, Pak Choy, Tatsoi etc.), Lettuce, Celery.

You can also sow from seed direct into your vegetable beds:

Carrots, Beetroot, Parsnip, Turnips, Radish, Coriander, Rocket.

Remember to cover any seedlings from the Brassica family with insect netting for the next couple of months until the Cabbage White butterflies are no longer around or spray your seedlings regularly with Dipel (Bacillus thuringiensis).


How to grow delicious salads on your kitchen bench…

IMAG1961

While doing some research in my local library for an article on growing your own sprouts, I happened to stumble upon a book by Peter Burke with the title ‘Year-round indoor salad gardening’. The book describes Burke’s technique for growing, as the title suggests, year-round salad leaves on your kitchen bench, in a simple and easy way, without the need for any specialised equipment. I immediately thought that this technique is a great solution for people who want to have the benefits of eating nutritious home-grown salads, but either don’t have space for a vegetable garden, don’t have the time to tend a vegetable garden or have physical limitations due to health issues. So before writing about Burke’s technique and putting my article on sprouting seeds on the back burner, the scientist in me thought it best to try it for myself first, just to check it really was that easy. Here’s how it went…

Burke’s technique combines part sprouting in jars and part soil sprouting, to produce edible salad leaves in the form of microgreens. Microgreens are vegetables or herbs that are eaten at a seedling stage, at which point they taste like the mature vegetable but contain a much higher concentration of nutrients. Using conventional methods to produce microgreens can take 2-4 weeks but by using this technique you can harvest in only 7-10 days.

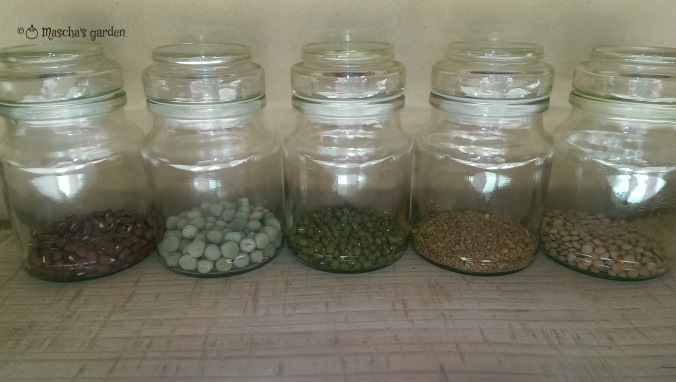
The equipment that you will need for this indoor salad garden includes; glass jars, organic seeds, aluminium foil trays (about 15cmx22cmx5cm in size), newspaper or paper towel, a small strainer, water in a small spray bottle, seed raising mix and a little compost, worm castings or some organic fertiliser.

IMAG1906

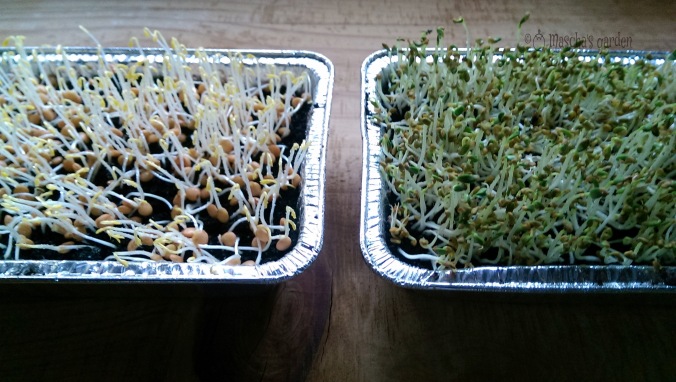
Step 1 Soak the seeds in a jar of warm water for 6 hours (or overnight). You can use any organic vegetable or herb seed which has edible leaves, but seeds in the Brassica family (kale, broccoli, cabbage, canola, kohlrabi) are particularly nutritious and beetroot, red amaranth, buckwheat and purple basil add great colour to your salad. I used adzuki beans, snow peas, mung beans, fenugreek and lentils for my experiment as I already had these seeds available. For the smaller seeds you need to soak about a heaped tablespoon per tray and for the larger seeds, such as the peas, you need about 80 seeds.

IMAG1909

Step 2 Using one foil tray per seed variety, add a 1 cm layer of seed raising mix, with a couple of tablespoons of compost/worm casting or a small sprinkle of organic fertiliser spread over the top. Fill the rest of the trays with more seed raising mix until they are filled about 1/2 cm from the top of the tray. Level the mix but don’t pat it down. If your mix feels dry, squirt it with some water from a spray bottle (your mix should be moist but not wet as there are no drainage holes in your tray).

IMAG1914

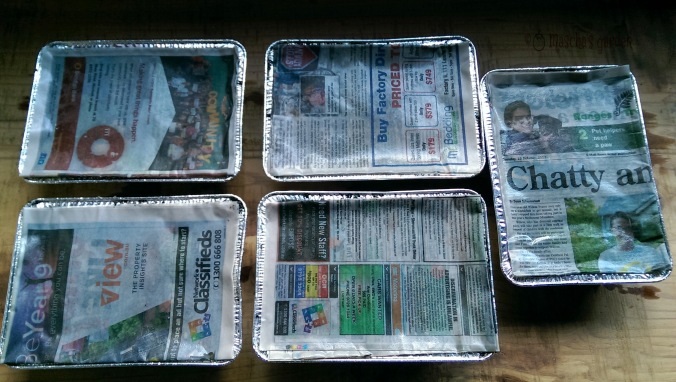
Step 3 Fold a sheet of newspaper or paper towel to fit the top of your tray (a few layers thick) and soak the folded paper in a shallow tray of warm water. In the meantime strain the water off the seeds by pouring them into a small strainer and rinse them with some fresh water. Spread the seeds evenly on top of the seed raising mix, then cover with the folded newspaper/paper towel and gently press the paper down to ensure that the seeds underneath make good contact with the soil.

Step 4 Place the trays in a warm (18-21ºC), dark cupboard for 4 days, keeping the newspapers wet if they dry by squirting with some water. The sprouts should be 2-3cm high and have pushed the newspaper up by the end of this time. If temperatures were a bit too cold this step may take an extra day or two. I found this to be the case with the larger seeds of my snow peas, mung beans and adzuki beans which I left in the cupboard for an extra day.

IMAG1947

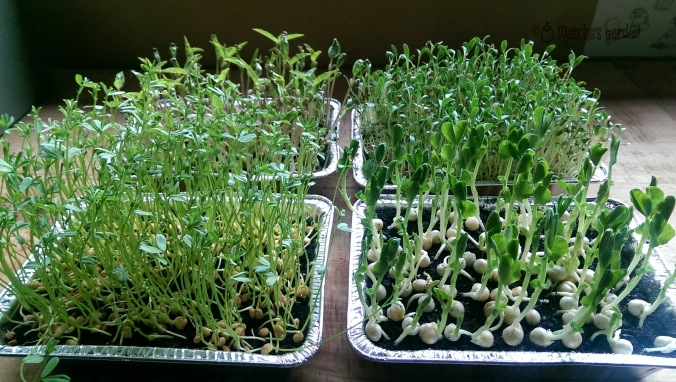
Step 5 You now need to green your sprouts by taking off the newspaper covers and placing the trays on a sunny bench near a window, they don’t need direct sunlight. I placed mine on a workbench in my garden shed which is under a north facing window, but a kitchen bench would work well too and you don’t necessarily need a window that faces north. Over the next three days water the soil in the trays everyday with about 2-4 tablespoons of water and rotate the trays each day so that the sprouts grow straight and not towards the light.

IMAG1958

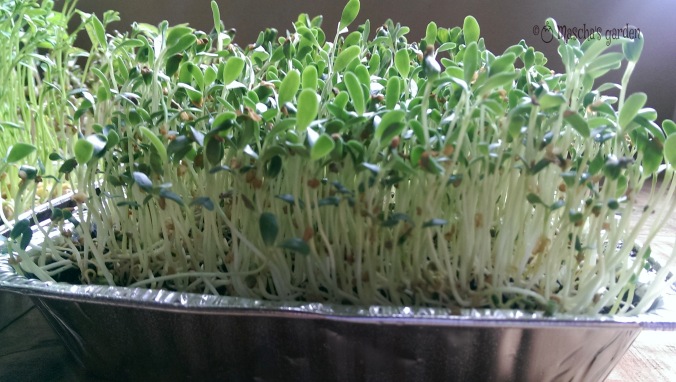
Step 6 After only 7-10 days from when you first soaked your seeds, your salad is ready to harvest. It really is that quick and easy! To harvest simply cut your greens about half a centimetre above the soil level with a pair of scissors. Give them a very gentle rinse under some cold water to remove any soil particles and seed husks and they are ready to eat.

IMAG1963

You may want to grate some carrot or beetroot through your sprouts, or add a handful of chickpeas or finely chopped tomatoes. Your sprouts are also great as a garnish on top of a lentil Dahl or in rice paper rolls. If you sow a new couple of trays every few days you could have a continuous supply of sprouted salad greens.

IMAG1975

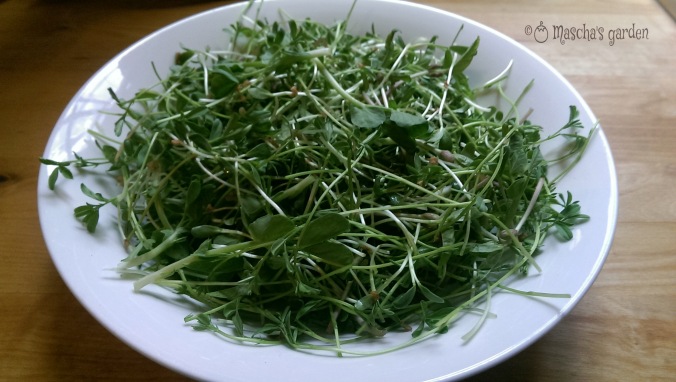
This indoor salad only took 8 days to grow!

Enjoy!

How to make a garlic plait

fullsizeoutput_577

It took seven months to grow but only three minutes to plait this garlic…I wonder how long it will take to eat it all?

Turning your home-grown garlic into a beautiful plait to hang in your kitchen or to give as a present to friends or family is very satisfying and not that difficult once you know how.

When your garlic is ready (see Knowing when to harvest your garlic) and it’s out of the ground, it’s best to let it dry somewhere for a couple of weeks in a spot out of the weather with good airflow to prevent your garlic going mouldy (which can happen if you plait it while the leaves are still fresh and green); a covered veranda or carport is ideal. Once it’s fairly dry, but not so brittle that the leaves break off, it’s time to clean it before plaiting.

fullsizeoutput_578

A cleaned bulb on the left

To clean my garlic I cut the roots off with some scissors and with a soft brush remove any dry soil that may be on the garlic. With some varieties of garlic it is sometimes possible to gently rub the outermost papery layer off with your fingers, however make sure you don’t peel off more than one layer as the dry skin surrounding your garlic bulbs help them store for longer.

Now you are ready to plait…in the video below I show how easy it is to do it!


What to grow in December (Cool/Temperate Climate)

IMAG0115

I’ve been so busy with my garden at home and at work lately that before I knew it, the first week of December had already passed…so apologies for this late blog on what to grow this month. We’ve had a very high rainfall so far in December (a bit too much in some areas) and combined with the warmer temperatures, your vegetables should be growing right before your eyes.

If you’ve got some space left in your vegetable garden here’s what to grow this month:

You can plant: potatoes, tomatoes, tomatillos, cucumbers, capsicum, chillies, eggplant, zucchini, squash, spaghetti squash, pumpkin, corn, celery, cauliflower, broccoli, spring onions, lettuce, leeks, basil and other herbs.

You can sow from seed: kale, silverbeet, lettuce, beans (bush and climbing), beetroot, Asian greens, corn, cabbage, carrots, leek, spring onions, zucchini, squash, spaghetti squash, turnips, swedes, parsnips, smaller pumpkin varieties, cucumbers, perennial spinach, radishes, cauliflower, broccoli, kohlrabi and celery.

fullsizeoutput_576

How to sow seeds

IMAG1891#1

When you’re new to vegetable gardening the easiest way to get started is to buy some seedlings from a garden centre and plant them out. However the range of things to plant and the varieties available are very limiting, so sowing from seed is the way to go. There are many organic seed companies that you can order from online, or you may have a gardening friend who saves their own seed and is happy to share some with you. Beware though, looking through seed catalogues is addictive and often results in you buying more seeds than you have space for in the garden!

Here is my guide for some common vegetables and how best to sow them:

Seeds that should be sown directly into a garden bed:

Parsnip
Swede
Beetroot
Carrot
Radish
Beans
Peas
Turnip

Seeds that are best sown into seedling punnets and planted out as seedlings:

Tomato
Capsicum
Eggplant
Broccoli
Cabbage
Brussel sprouts
Kale
Cauliflower
Celery
Onion

Seeds that can either be sown direct or into seedling punnets first:

Rocket
Pumpkin*
Corn
Zucchini*
Squash*
Cucumber*
Leek
Spring onion
Spinach
Lettuce

*Careful not to disturb the roots of these seedlings when planting out

It’s also important to plant seeds at the correct depth, generally 2 to 3 times their width. Keep soil moist after planting but not soggy; if you let the soil dry out after the seed germinates it will die, if the soil is too wet the seed may rot before it even starts to grow. And remember to sow your seeds in their correct season!

IMAG1719#1

Sowing peas directly in the ground

What to grow in November (Cool/Temperate Climate)

sunflowers

It’s 15ºC and raining outside on the first day of the last month of Spring. It’s just as well I’ve been too busy lately to get my summer vegetable seedlings planted early as the temperatures have been much cooler in our region this last month then they were this time last year.

The weather can be unpredictable sometimes and if you find that the early tomatoes, capsicums, eggplants etc. you planted on a beautiful sunny day in October are now shivering in an unexpected return of winter weather, you can always protect them with a mini greenhouse made from plastic bottles with the base cut out or some plastic plant guards until the warmer weather returns.

With the hope of sunny days ahead here’s what you can plant this month:

Potatoes, tomatoes, tomatillos, eggplants, capsicum, chillies, cucumbers, sweetcorn, celery, celeriac, globe artichokes, jerusalem artichokes, kale, cabbage, cauliflower, broccoli, Asian greens (pak choy, bok choy, wombok etc.), carrots, beetroot, swedes, turnips, radishes, beans (climbing and bush), spring onions, leeks, yacon, perennial spinach, zucchini, pumpkins, squash, lettuce, rocket, mizuna, basil, parsley, coriander, chives and most other herbs…

…and of course lots of sunflowers to bring out the sun!


Knowing when to harvest your garlic

garlic

Growing your own garlic is not difficult but does require a bit of patience as the time from planting till harvesting can take 7-8 months. If you harvest garlic too early, you are left with very small cloves that are frustrating to peel, harvest too late and your cloves will have burst apart making your bulbs look unattractive and you will also have reduced your garlic’s storage life. In order to know when the right time to harvest your garlic is, you need to understand a little bit about the growth stages of garlic.

IMAG1950

Garlic growing in mid-October. The weather is warming up, days are getting longer and bulbs are growing.

In Melbourne garlic is best planted in early Autumn (April-May). Planting at this time ensures that your garlic puts on lots of growth before turning its energies into forming bulbs. Once bulb formation is triggered by increasing day length and higher soil and air temperature, leaf growth stops. Garlic that is planted too late in the season won’t have enough leaf growth to support the formation of large bulbs. Temperatures above 33ºC signal the end of bulb growth and the start of drying off, this process is irreversible, so early, unseasonably high temperatures can sometimes result in a disappointing garlic crop, especially for gardeners in warmer climates as garlic bulbs can double in size during the last month of their growth.

IMAG1949

The ninth leaf from the top is starting to brown…still a while till harvest time.

Your garlic is ready to harvest when the sixth leaf (counting from the top of your plant) starts to brown off and there are therefore only five green leaves left on the top of your garlic plant. Each green leaf corresponds to a layer of protective skin that will cover your garlic bulb after harvest and is required for the optimum storage life of your garlic.

If you are growing a hardneck variety of garlic you will find flower stems (scapes) developing from your garlic plants during the last months of growth. It is best to harvest these on a regular basis (by pulling them carefully from the centre of your garlic plant) so that they don’t take the energy out of the garlic bulbs that are forming. Scapes can be chopped up and used as a garlic substitute in many dishes.

GarlicScapes

Garlic scapes ready for harvesting.

For more information on growing garlic visit my blog article: How to grow garlic


What to grow in October (Cool/Temperate climate)

pumpkin seedlings

The warmer weather is finally here and now that the soil is also warming up you can get busy planting out your vegetable beds with a huge variety of vegetables and herbs.

Early October you can plant/sow:

Silverbeet, Rainbow Chard, Broccoli, Kohlrabi, Cauliflower, Asian greens, Cabbages, Spinach, Leeks, Lettuce, Celery, Endive, Spring onions, Radish, Carrots, Beetroot, Parsnip, Swede, Turnips, Peas, Snow peas, Rocket, Celeriac, Yacon, Potatoes and most herbs.

Late in October you can continue to sow/plant the vegetables listed above, as well as sow/plant into a warm part of the garden:

Tomatoes, Tomatillo, Cucumbers, Eggplant, Corn, Pumpkin, Squash, Bush and Climbing Beans, Chillies and Capsicums.

Note: This advice is based on my experience in growing vegetables in Melbourne’s Yarra Valley and Dandenong Ranges areas.

october seedlings